skip to main |
skip to sidebar


When we made Josephine's first birthday present, both Ben and I were pretty sure it was a tradition we wanted to continue for as long as possible. After Phiney's little best bud got a toy kitchen in the autumn, and seeing how much Josephine adored it, we knew that would be the ideal present - and one, according to Pinterest, that would be possible to make ourselves.
We stocked up on random materials over the months leading up to Christmas and were over the moon when we stumbled upon the (pretty horrendous) 1970s bedside table that would turn out to be the ideal toy kitchen, in a charity shop. Ben always planned to get it painted over his Christmas holidays from work, but then everything happened with my Dad.
Josephine, of course, didn't notice that her only birthday present from us was her lion necklace, and that her main present sat in the corner, untouched, for three months. But we really wanted to get it all sorted before Baby's arrival so a couple of weeks ago we got stuck in and had so much fun designing it together.
The hardware store in the local market in town was brilliant for the bits and pieces, including the gingham vinyl worktop, the enamel washing-up bowl, the hooks and the curtain rail, while the haberdashery supplied the quintessential 1950s-style fabric for the curtains. For the rest - well, you can't beat Ikea. The cooker knobs, fruit and veg baskets, saucepans, crockery (Josephine's birthday present from my best friend) and all the storage pots were courtesy of the kitchen department. Finally, you can always count on my Grandparents to have something like an old tap buried in the shed, and having something authentic like that really makes the kitchen, I think.
As for the fruit, veg, cakes and toaster etc - I was lucky enough to pop into our local charity shop and find a massive storage box packed with toy kitchen pieces for just £4 a few months back. Perfect!
When we presented Josephine with her kitchen last weekend, her face was a picture. It was utter disbelief, wonder and excitement all rolled into one, and she hasn't stopped playing with it for a second. We love that she adores something we made her, so so much. And the little phrases she comes up with while she's 'cooking' are the best. She is a carbon copy of Ben in the kitchen and it makes us both smile so big to see her playing with it so happily.
Here's to many more Mama and Daddy-made birthday presents :)
I have loved the process of crafting since I was small. There's nothing more satisfying than starting a project, choosing which materials to use and creating a design, then learning new skills and processes and ultimately completing something unique. I've made cushions and clothes, laundry bags and toys, all for the fun of it.
But right now, more than anything, I'm loving practical projects. Crafting for a reason. When time is short, it's good to know that what I'm making is fulfilling a purpose. And to be honest, with a deadline that often accompanies such projects (birthdays, mother's day, Easter, the need for new baby clothes after Josephine has had a growth spurt) I'm more likely to actually finish the piece.
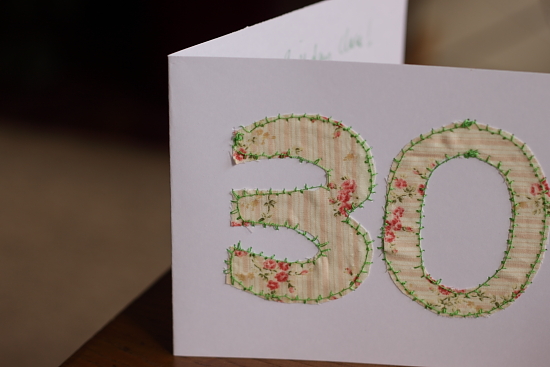
My current crafting obsession is making cards. If you're looking for a simple, yet oh so satisfying new hobby, making cards like these will have you hooked in no time. My beautiful friend Laura gave Josephine one of the best first birthday cards (a simple '1' in red stars on crisp white card) and then made the sweetest thank you cards to send friends and family for the presents they received after the birth of their second baby (brown paper baby-gros on a washing line of stitching). She's the card-making queen and I totally stole this idea from her. We've been known to have in-depth text conversations about this hobby. We're cool like that.
There are many reasons why this hobby is so pleasing. Firstly, I love sending cards so it's very handy having a stash ready to give. I think it's a habit I've inherited from my Grandma, although my lovely Icelandic friend Bibi said that it's a very English thing to do too. As well as birthday cards and thank you notes, there are cards to welcome babies to the world and cards to keep up with penpals that make their way across oceans. And, as my sister (a fellow card-giver enthusiast) and I were discussing in a card shop a few weeks ago, cards are so reflective of your style that finding the ideal design in a shop can be a real mission. Making your own ensures a piece of stationary that suits your aesthetic tastes perfectly and is totally unique.
And secondly, cards are so blooming expensive (I could easily spend £4 on a card; finding anything cheaper yet pretty is near to impossible) that making my own fits very happily in our living on a budget. Plus, while some new crafty hobbies can take a bit of an investment financially, this one instead offers the perfect opportunity to use all those fabric scraps I've accumulated from other projects.
HOW TO
1. Fold and cut your card into the size and shape desired.
2. Get designing with all the scraps of fabric you've kept but have been wondering what to do with. Small, cute babies are very helpful with this part. Seriously, it's a great one to do with the kids. Phiney spends ages happily rummaging through my fabric box!
3. Use a small dab of fabric glue to attach your design to the card, to ensure it doesn't slip while you're sewing.
4. Using a zigzag stitch (or something similar) stitch round the design, remembering to keep it as neat as possible; you'll see the stitching on the inside don't forget.
I think my favourites so far are the bunting designs (they would make the sweetest invitations too) and the flower birthday card I made for my lovely friend Amy. You should definitely give this craft a go. So easy and simple, yet really effective and fun.
ps. In my mind the only thing as good as handmade is vintage. So if you're looking for the perfect card but don't have the time to make your own head over here. Emily has just opened her store and it's so good. SO good.


 For the longest time, I've always strived to make the presents we give. For Christmas, birthdays, Valentines Day and Easter; for my family and friends, from the young to the old. I believe there is something truly beautiful about crafting something unique and made with love for the people I love. I get so excited about the giving of these gifts, and am always so happy and touched to see how well they are received. To see the samplers I've stitched hanging on the wall, the cushions I've sewn sitting on a sofa, the booties I've knitted keeping little toes warm.
Ben and I, as far back as I can remember, have always handmade the majority of our gifts to each other and when Josephine came into our lives, we decided to keep up this sweet tradition. To ensure there was always at least one present we'd crafted for her under the Christmas tree or to celebrate her birthday. How wonderful to have a home full of such treasures.
For her first birthday, we knew we wanted to create something extra special. Something that Josephine would adore, would use for years to come and would always remember with fondness as something her Mama and Papa made with their own hands.
The Internet is a marvellous thing for a whole bunch of reasons, but if you love craft and DIY, it offers a scrapbook of the most amazing ideas. I have spent hours scrolling the pages of blog after blog, inspired by insanely cool projects, although the girls over at A Beautiful Mess are hard to beat. And when I stumbled upon their Make Your Own A-Frame Tent tutorial, I knew I'd found exactly what we were looking for, and Ben instantly agreed. After all, what one year old wouldn't love their own little house; somewhere to hide away with their favourite toys and host tea parties with their buddies. And what Mama and Papa wouldn't love to get in there too and visit the little world of their little one.
If you're stuck for ideas as to what to get the special kiddo in your life, I urge you to head to your DIY store, get out the drill and get creating. They'll love you for it, believe me. Josephine spends a good chunk of every day in her tent, as do I, and it's the sweetest thing to find her in there sharing her raisins and chatting with Teddy.
And don't forget - you can save a pretty penny making the gifts you give. Josephine's tent cost us under £20, including the cost of wood, material and trimmings. A beautiful bargain.
JOSPEPHINE'S A-FRAME TENT - THE DETAILS
For Phiney's tent we used a huge scarf I bought about five years ago in H&M and had never used because, well, it was absolutely huge. It was the ideal thing for this tent though, as it was slightly see-through so ensured the tent was nice and light inside and that Phiney could see out. Some bobbled trimmings added some sweet detail and we put some tape (green washi tape in our case, so much more aesthetically pleasing!) on either side of each join to ensure the pieces didn't slip at all.
MY FAVOURITE PICKS
The A-Frame Tent not for you? Here are a few other awesome tutorials from A Beautiful Mess that we love. That kitchen? Most definitely on the list as a future present for Josephine.
^^ DIY drums
^^ DIY kitchenette
^^ Play Teepee